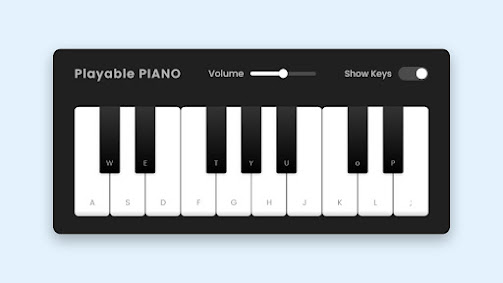
Using JavaScript to build a playable piano can be a fun and challenging way to learn and improve your coding skills. This blog will teach you How to Make A Virtual Playable PIANO in HTML, CSS, and JavaScript from scratch that can be played directly in a web browser.
If you don’t know, a piano is a musical instrument that produces sound by striking a series of keys or notes on a keyboard. On my piano, users can play various tunes by clicking on the keys or using the keyboard keys. They can also adjust the volume and show or hide shortcut keys on the piano.
Steps to Build A Playable PIANO in JavaScript
To build a playable virtual piano using HTML, CSS, and JavaScript, follow the given steps line by line:
- Create a folder. You can name this folder whatever you want and put the files listed below inside it.
- Create an
index.htmlfile. The file name must be index and its extension .html - Create a
style.cssfile. The file name must be style and its extension .css - Create a
script.jsfile. The file name must be script and its extension .js - Download the
tunes folderof this piano from Google Drive and put it in the same project folder.
First, paste the following codes into your index.html file:
<!DOCTYPE html>
<html lang="en" dir="ltr">
<head>
<meta charset="utf-8">
<title>Playable Piano JavaScript | kishan kharb</title>
<link rel="stylesheet" href="style.css">
<meta name="viewport" content="width=device-width, initial-scale=1.0">
<script src="script.js" defer></script>
</head>
<body>
<div class="wrapper">
<header>
<h2>Playable PIANO</h2>
<div class="column volume-slider">
<span>Volume</span><input type="range" min="0" max="1" value="0.5" step="any">
</div>
<div class="column keys-checkbox">
<span>Show Keys</span><input type="checkbox" checked>
</div>
</header>
<ul class="piano-keys">
<li class="key white" data-key="a"><span>a</span></li>
<li class="key black" data-key="w"><span>w</span></li>
<li class="key white" data-key="s"><span>s</span></li>
<li class="key black" data-key="e"><span>e</span></li>
<li class="key white" data-key="d"><span>d</span></li>
<li class="key white" data-key="f"><span>f</span></li>
<li class="key black" data-key="t"><span>t</span></li>
<li class="key white" data-key="g"><span>g</span></li>
<li class="key black" data-key="y"><span>y</span></li>
<li class="key white" data-key="h"><span>h</span></li>
<li class="key black" data-key="u"><span>u</span></li>
<li class="key white" data-key="j"><span>j</span></li>
<li class="key white" data-key="k"><span>k</span></li>
<li class="key black" data-key="o"><span>o</span></li>
<li class="key white" data-key="l"><span>l</span></li>
<li class="key black" data-key="p"><span>p</span></li>
<li class="key white" data-key=";"><span>;</span></li>
</ul>
</div>
</body>
</html>
Second, paste the following codes into your style.css file:
/* Import Google font - Poppins */
@import url('https://fonts.googleapis.com/css2?family=Poppins:wght@400;500;600&display=swap');
* {
margin: 0;
padding: 0;
box-sizing: border-box;
font-family: 'Poppins', sans-serif;
}
body {
display: flex;
align-items: center;
justify-content: center;
min-height: 100vh;
background: #E3F2FD;
}
.wrapper {
padding: 35px 40px;
border-radius: 20px;
background: #141414;
}
.wrapper header {
display: flex;
color: #B2B2B2;
align-items: center;
justify-content: space-between;
}
header h2 {
font-size: 1.6rem;
}
header .column {
display: flex;
align-items: center;
}
header span {
font-weight: 500;
margin-right: 15px;
font-size: 1.19rem;
}
header input {
outline: none;
border-radius: 30px;
}
.volume-slider input {
accent-color: #fff;
}
.keys-checkbox input {
height: 30px;
width: 60px;
cursor: pointer;
appearance: none;
position: relative;
background: #4B4B4B
}
.keys-checkbox input::before {
content: "";
position: absolute;
top: 50%;
left: 5px;
width: 20px;
height: 20px;
border-radius: 50%;
background: #8c8c8c;
transform: translateY(-50%);
transition: all 0.3s ease;
}
.keys-checkbox input:checked::before {
left: 35px;
background: #fff;
}
.piano-keys {
display: flex;
list-style: none;
margin-top: 40px;
}
.piano-keys .key {
cursor: pointer;
user-select: none;
position: relative;
text-transform: uppercase;
}
.piano-keys .black {
z-index: 2;
width: 44px;
height: 140px;
margin: 0 -22px 0 -22px;
border-radius: 0 0 5px 5px;
background: linear-gradient(#333, #000);
}
.piano-keys .black.active {
box-shadow: inset -5px -10px 10px rgba(255,255,255,0.1);
background:linear-gradient(to bottom, #000, #434343);
}
.piano-keys .white {
height: 230px;
width: 70px;
border-radius: 8px;
border: 1px solid #000;
background: linear-gradient(#fff 96%, #eee 4%);
}
.piano-keys .white.active {
box-shadow: inset -5px 5px 20px rgba(0,0,0,0.2);
background:linear-gradient(to bottom, #fff 0%, #eee 100%);
}
.piano-keys .key span {
position: absolute;
bottom: 20px;
width: 100%;
color: #A2A2A2;
font-size: 1.13rem;
text-align: center;
}
.piano-keys .key.hide span {
display: none;
}
.piano-keys .black span {
bottom: 13px;
color: #888888;
}
@media screen and (max-width: 815px) {
.wrapper {
padding: 25px;
}
header {
flex-direction: column;
}
header :where(h2, .column) {
margin-bottom: 13px;
}
.volume-slider input {
max-width: 100px;
}
.piano-keys {
margin-top: 20px;
}
.piano-keys .key:where(:nth-child(9), :nth-child(10)) {
display: none;
}
.piano-keys .black {
height: 100px;
width: 40px;
margin: 0 -20px 0 -20px;
}
.piano-keys .white {
height: 180px;
width: 60px;
}
}
@media screen and (max-width: 615px) {
.piano-keys .key:nth-child(13),
.piano-keys .key:nth-child(14),
.piano-keys .key:nth-child(15),
.piano-keys .key:nth-child(16),
.piano-keys .key :nth-child(17) {
display: none;
}
.piano-keys .white {
width: 50px;
}
}
const pianoKeys = document.querySelectorAll(".piano-keys .key"),
volumeSlider = document.querySelector(".volume-slider input"),
keysCheckbox = document.querySelector(".keys-checkbox input");
let allKeys = [],
audio = new Audio(`tunes/a.wav`); // by default, audio src is "a" tune
const playTune = (key) => {
audio.src = `tunes/${key}.wav`; // passing audio src based on key pressed
audio.play(); // playing audio
const clickedKey = document.querySelector(`[data-key="${key}"]`); // getting clicked key element
clickedKey.classList.add("active"); // adding active class to the clicked key element
setTimeout(() => { // removing active class after 150 ms from the clicked key element
clickedKey.classList.remove("active");
}, 150);
}
pianoKeys.forEach(key => {
allKeys.push(key.dataset.key); // adding data-key value to the allKeys array
// calling playTune function with passing data-key value as an argument
key.addEventListener("click", () => playTune(key.dataset.key));
});
const handleVolume = (e) => {
audio.volume = e.target.value; // passing the range slider value as an audio volume
}
const showHideKeys = () => {
// toggling hide class from each key on the checkbox click
pianoKeys.forEach(key => key.classList.toggle("hide"));
}
const pressedKey = (e) => {
// if the pressed key is in the allKeys array, only call the playTune function
if(allKeys.includes(e.key)) playTune(e.key);
}
keysCheckbox.addEventListener("click", showHideKeys);
volumeSlider.addEventListener("input", handleVolume);
document.addEventListener("keydown", pressedKey);
That’s all, now you’ve successfully created a CSS3 – Neumorphism Pagination Design. If your code doesn’t work or you’ve faced any error/problem then please comment down or contact us from the contact page.

Comments
Post a Comment